Monday, 23. February 2009
Feb 23
Test-Driven development (TDD) is a well known software development technique and follows the mantra “Red-Green-Refactor”. Behavior-Driven Development (BDD) is a response to TDD and introduces the idea of using natural language to express the Unit Test scenarios.
There are a lot of popular testing frameworks around which can be used for BDD including xUnit.net ,NUnit, StoryQ, MSpec, NSpec and NBehave. Most of them can be used with fluent interfaces and therefore provides a good readability of the sources. Some of them even provide the possibility to generate a spec in natural language out of passed Unit tests.
What is a spec?
“A specification is an explicit set of requirements to be satisfied by a material, product, or service.”
American Society for Testing and Materials (ASTM) definition
A spec is an important document for the communication process – it enables domain experts to communicate with developers. But how can you verify the compliance with the spec? The answer is: you have to write unit tests. Even with the mentioned frameworks there is a lot of work to do in order to translate a spec scenario into a Unit Test.
Question 7 in the famous Joel Test is “Do you have a spec?”.
The idea of NaturalSpec is to give domain experts the possibility to express their scenarios directly in compilable Unit Test scenarios by using a Domain-specific language (DSL) for Unit Tests. NaturalSpec is completely written in F# – but you don’t have to learn F# to use it. You don’t even have to learn programming at all.
Example 1 – Specifying a list
Let’s consider a small example. If we want to test a new List implementation a spec could look like this:
[<Scenario>]
let When_removing_an_3_from_a_small_list_it_should_not_contain_3() =
  Given [1;2;3;4;5]              // “Arrange” test context
    |> When removing 3           // “Act”
    |> It shouldn't contain 3    // “Assert”
    |> It should contain 4       // another assertion
    |> Verify                    // Verify scenario
I used BDD style here and expressed my scenario in a quite natural language. As the comments are indicating the scenario is following the Arrange Act Assert (“AAA”) pattern.
With the Keyword “Given” I can create a test context (the objects I want to test). In this sample I created a list with 5 elements. With the keyword “When” I call a function which does something with my test context. In this case I want to remove the value 3. In the Assert section (keywords “It should” or “It shouldn’t”) I can give some observations, which should hold for my manipulated test context.
When I run this scenario via a NUnit runner (i am using TestDriven.Net) I get the following output:
Scenario: When removing an 3 from a small list it should not contain 3
– Given [1; 2; 3; 4; 5]
– When removing 3
=> It should not contain 3
=> It should contain 4
==> OK
Example 2 – Specifying a factorial function
If you implement factorial function the spec could look like this:
[<Scenario>]
let When_calculating_fac_5_it_should_equal_120() =
  Given 5
    |> When calculating factorial
    |> It should equal 120
    |> Verify

[<Scenario>]
let When_calculating_fac_1_it_should_equal_1() =
  Given 1
    |> When calculating factorial
    |> It should equal 1
    |> Verify

[<Scenario>]
let When_calculating_fac_0_it_should_equal_0() =
  Given 0
    |> When calculating factorial
    |> It should equal 1
    |> Verify
And the output of NaturalSpec would look like this:
Scenario: When calculating fac 0 it should equal 0
– Given 0
– When calculating factorial
=> It should equal 1
==> OK
Scenario: When calculating fac 1 it should equal 1
– Given 1
– When calculating factorial
=> It should equal 1
==> OK
Scenario: When calculating fac 5 it should equal 120
– Given 5
– When calculating factorial
=> It should equal 120
==> OK
Getting started
Of course you can use NaturalSpec to specify C# objects. I see my post "Using NaturalSpec to create a spec for C# projects" for a small sample.
You can download NaturalSpec at GoogleCode and follow the “Getting started” tutorial in order to write your first automatically testable spec.
I am very interested in your feedback. Do you like the syntax? What should I change? Do you consider using a spec tool like NaturalSpec?
Tags:
BDD,
Behavior-Driven Development,
domain-specific language,
DSL,
F#,
Joel test,
NaturalSpec,
nunit,
spec,
TDD,
Test-Driven Development,
TestDriven.net
Sunday, 11. January 2009
Jan 11
In the last 3 posts I show how to set up a Continuous Integration environment for F# or C# projects with Subversion (part I), TeamCity (part II) and NUnit (part III).
This time I want to show how we can set up an automated documentation build.
Installing and using GhostDoc
“GhostDoc is a free add-in for Visual Studio that automatically generates XML documentation comments for C#. Either by using existing documentation inherited from base classes or implemented interfaces, or by deducing comments from name and type of e.g. methods, properties or parameters.”
[product website]
GhostDoc is one of my favorite Visual Studio plugins. It allows me to generate comments for nearly all my C# functions. Of course these generated comments aren’t sufficient in every case – but they are a very good start.
Unfortunately GhostDoc doesn’t work for F# 🙁 – the actual version works for C# and the support for VB.Net is called “experimental”.
Download and install http://www.roland-weigelt.de/ghostdoc/.
Now you should be able to generate XML-based comments directly in your C# code:


The next step is to activate the xml-documentation in your Visual Studio build settings:

Commiting these changes and adjusting the build artifacts will produce the input for the documentation build:


Using Sandcastle to generate a documentation
“Sandcastle produces accurate, MSDN style, comprehensive documentation by reflecting over the source assemblies and optionally integrating XML Documentation Comments. Sandcastle has the following key features:
- Works with or without authored comments
- Supports Generics and .NET Framework 2.0
- Sandcastle has 2 main components (MrefBuilder and Build Assembler)
- MrefBuilder generates reflection xml file for Build Assembler
- Build Assembler includes syntax generation, transformation..etc
- Sandcastle is used internally to build .Net Framework documentation”
[Microsoft.com]
Download and install “Sandcastle – Documentation Compiler for Managed Class Libraries” from Mircosoft’s downloadpage or http://www.codeplex.com/Sandcastle.
For .chm generation you also have to install the “HTML Help Workshop“. If you want fancy HTMLHelp 2.x style (like MSDN has) you need “Innovasys HelpStudio Lite” which is part of the Visual Studio 2008 SDK.
“HelpStudio Lite is offered with the Visual Studio SDK as an installed component that integrates with Visual Studio. HelpStudio Lite provides a set of authoring tools you use to author and build Help content, create and manage Help projects, and compile Help files that can be integrated with the Visual Studio Help collection.”
[MSDN]
Last but not least I recommend to install the Sandcastle Help File Builder (SHFB) – this tool gives you a GUI and helps to automate the Sandcastle process.
“Sandcastle, created by Microsoft, is a tool used for creating MSDN-style documentation from .NET assemblies and their associated XML comments files. The current version is the May 2008 release. It is command line based and has no GUI front-end, project management features, or an automated build process like those that you can find in NDoc. The Sandcastle Help File Builder was created to fill in the gaps, provide the missing NDoc-like features that are used most often, and provide graphical and command line based tools to build a help file in an automated fashion.”
[product homepage]
After the installation process start SHFB to generate a documentation project:

Add the TestCITestLib.dll to your project and add nunit.framework.dll as a dependency. Now try to compile your help project – if everything is fine the output should look something like this:

Setting up the documentation build
One of the main principles of Continuous Integration is “Keep the Build Fast” – so I am working with staged builds here. The documentation build should only be started if the first build was successful and all UnitTests are positive. For most projects it is enough to generate the documentation daily or even weekly.
First of all we have to create a simple MSBuild file which executes the SHFB project:
<Project ToolsVersion="3.5" xmlns="http://schemas.microsoft.com/developer/msbuild/2003">
  <!-- 3rd Party Program Settings -->
  <PropertyGroup>
    <SandCastleHFBPath>c:\Program Files (x86)\EWSoftware\Sandcastle Help File Builder\</SandCastleHFBPath>
    <SandCastleHFBCmd>$(SandCastleHFBPath)SandcastleBuilderConsole.exe</SandCastleHFBCmd>
    <SandCastleHFBProject>HelpProject.shfb</SandCastleHFBProject>
  </PropertyGroup>

  <Target Name="BuildDocumentation">
    <!-- Build source code docs -->
    <Exec Command="%22$(SandCastleHFBCmd)%22 %22$(SandCastleHFBProject)%22" />
  </Target>
</Project>
Add this build file and the SHFB project to your Visual Studio solution folder and commit these changes.

Now we can create a new TeamCity build configuration:

Take the same Version Control Settings like in the first build but use MSBuild as the build runner:

We want the documentation to be generated after a successful main build so we add a “dependency build trigger”:

Now we need the artifacts from the main build as the input for our documentation build:

Be sure you copy the artifacts to the right directory as given in your .shfb-project. Now run the DocumentationBuild – if everything is fine the DocumentationBuild should give you the Documentation.chm as a new artifact:

Tags:
Continuous Integration,
F#,
GhostDoc,
JetBrains,
NDoc,
Sandcastle,
Sandcastle Help File Build,
subversion,
TeamCity,
Visual Studio 2008,
Visual Studio SDK
Thursday, 8. January 2009
Jan 08
In the last two posts I showed how to set up a Subversion (part I: Setting up Source Control) and a TeamCity server (part II: Setting up a Continuous Integration Server).
This time I will show how we can integrate NUnit to run automated test at each build. TeamCity supports all major Testing Frameworks (including MS Test) but I will concentrate on NUnit here.
"NUnit is a unit-testing framework for all .Net languages. Initially ported from JUnit, the current production release, version 2.4, is the fifth major release of this xUnit based unit testing tool for Microsoft .NET. It is written entirely in C# and has been completely redesigned to take advantage of many .NET language features, for example custom attributes and other reflection related capabilities. NUnit brings xUnit to all .NET languages."
[product homepage]
Creating a TestProject
First of all download and install NUnit 2.4.8 (or higher) from http://www.nunit.org/.
Now we add a small function to our F# source code:
let rec factorial = function
  | 0 -> 1
  | n when n > 0 -> n * factorial (n-1)
  | _ -> invalid_arg "Argument not valid"
This is the function we want to test. We add a new C# class library to our solution (e.g. “TestCITestLib” 😉 ) and add a reference to nunit.framework. Inside this new TestLibrary we add a TestClass with the following code:
namespace TestCITestLib
{
    using NUnit.Framework;

    [TestFixture]
    public class FactorialTest
    {
        [Test]
        public void TestFactorial()
        {
            Assert.AreEqual(1, Program.factorial(0));
            Assert.AreEqual(1, Program.factorial(1));
            Assert.AreEqual(120, Program.factorial(5));
        }

        [Test]
        public void TestFactorialException()
        {
            Program.factorial(-1);
        }
    }
}
To ensure the build runner is able to compile our solution we put the nunit.framework.dll near to our TestProject and commit our changes.

Configure TeamCity for UnitTesting
The next step is to tell TeamCity that the build runner should run our UnitTests:

If we now run the build we should get the following error:

Our second test function failed, because we didn’t expect the System.ArgumentException. We can fix this issue by adding the corresponding attribute to the Testfunction:
[Test,
 ExpectedException(typeof(System.ArgumentException))]
public void TestFactorialException()
{
    Program.factorial(-1);
}0

Configure the build output
At this point we have a minimalistic Continuous Integration infrastructure. Every time someone performs a Commit on our repository a automated build will be started and the sources will be tested against the given UnitTests. Now we should concentrate on getting our build output – the artifacts. The term artifact is usually used to refer to files or directories produced during a build. Examples of such artifacts are:
- Binaries (*.exe, *.dll)
- Software packages and installers (*.zip, *.msi)
- Documentation files (e.g. help files)
- Reports (test reports, coverage reports, …)
At this time we are only interested in the binaries (this means CITestLib.dll). We can add the following artifact definition to our TeamCity project:

If we now rebuild our solution the build runner collects the configured artifacts and stores them with all build information:

Next time I will show how we can add more artifacts – e.g. an automated documentation.
Tags:
Continuous Integration,
F#,
JetBrains,
MSTest,
nunit,
subversion,
TeamCity,
UnitTest,
UnitTesting,
Visual Studio 2008
Jan 08
In the last post I showed how easy it is to install Subversion and how it can be integrated into Visual Studio 2008 via AnkhSVN. This time we will set up a Continuous Integration server and configure a build runner.
As a Continuous Integration Server I recommend JetBrains TeamCity. You can download the free professional edition at http://www.jetbrains.com/teamcity/.
Installing TeamCity
During the installation process TeamCity wants to get a port number. Be sure that there will be no conflict with other web applications on your server. I chose port 8085 – and my first build agent got this default settings:

In the next step you have to sign the License Agreement and to create an administrator account:

Creating a Project
Now you can create your project and set up the build configuration:


Setting up a build runner
For setting up specific build runners see the TeamCity documentation. For now I will use the “sln2008”-Build runner (the Runner for Microsoft Visual Studio 2008 solution files).

Now add a build trigger. Whenever someone performs a Commit on the Subversion repository the server has to start a build.

Testing the build runner
After this step we have two options to start a build. The first one is by clicking the “Run”-button on the project website and the second is doing a checkin:

After performing the Commit the pending build appears on the project website:

After 60 seconds (see my configuration above) the build is starting. After the build is complete one can see the results in different ways. The simplest is via the project website:

Of cause TeamCity gives you a lot of different notification and monitoring possibilities including mail, RSS feeds or System Tray Notifications.
Next time I will show how we can integrate UnitTesting in our automated build scenario.
Tags:
Continuous Integration,
F#,
JetBrains,
subversion,
TeamCity,
Visual Studio 2008
Jan 08
In this post series I will show how one can easily set up a Continuous Integration scenario for F# or C# projects with completely free products.
“Continuous Integration is a software development practice where members of a team integrate their work frequently, usually each person integrates at least daily – leading to multiple integrations per day. Each integration is verified by an automated build (including test) to detect integration errors as quickly as possible.”
[Martin Fowler]
The first step for Continuous Integration is to set up a Source Control environment. For many good reasons I choose Subversion – some of them are:
- Atomic commits
- Rename/Move/Copy actions preserve the revision history
- Directories are versioned
- Multiple repository access protocols including HTTP and HTTPS
- There is a nice Visual Studio integration (see below)
- Last but not least: it is completely free 🙂
Source code version control with Subversion
All you need for setting up a complete Subversion environment is to download and install VisualSVN Server from http://www.visualsvn.com/.
“VisualSVN Server is a package that contains everything you need to install, configure and manage Subversion server for your team on Windows platform. It includes Subversion, Apache and a management console.”
[product homepage]
Now you can create user accounts and a repository ”CITest” in the VisualSVN Server management console.


Subversion integration in Visual Studio 2008
Download and install AnkhSVN 2.0.x from http://ankhsvn.open.collab.net/.
“AnkhSVN is a Subversion SourceControl Provider for Visual Studio. The software allows you to perform the most common version control operations directly from inside the Microsoft Visual Studio IDE. With AnkhSVN you no longer need to leave your IDE to perform tasks like viewing the status of your source code, updating your Subversion working copy and committing changes. You can even browse your repository and you can plug-in your favorite diff tool.”
[product homepage]
Now you can add your C#/F#-solution to your CITest-repository:
- Open the solution in Visual Studio 2008
- Open “View/Repository Explorer” and add your repository to AnkhSVN
- You can copy the URL from the VisualSVN Server management console (In my case this is https://omega:8443/svn/CITest/)
- You also have to give AnkhSVN your Subversion login
- Now click the right mouse button on your solution in the Solution Explorer and choose “Add Solution to Subversion”


Now we can modify our solution and commit our changes via “Commit solution changes” in the Solution Explorer:

We can easily control our changes via AnkhSVN’s “Repository Explorer” and “History Viewer” in Visual Studio 2008:

If we do any changes in the Program.fs file, we can see a diff via the “Show changes” functionality:

If you don’t like the default Diff tool you might try WinMerge.
Next time I will show how to set up a Continuous Integration server.
Tags:
AnkhSVN,
Continuous Integration,
F#,
Source Control,
subversion,
Visual Studio 2008,
VisualSVN,
WinMerge
Thursday, 23. October 2008
Oct 23
If your wondering how Google computes query results in such a short time you have to read the famous “MapReduce”-Paper by Jeffrey Dean and Sanjay Ghemawat (2004). It shows how one can split large tasks into a mapping and a reduce step which could then be processed in parallel.
With PLINQ (part of the Parallel Extensions to the .NET Framework) you can easily use “MapReduce”-pattern in .NET and especially F#. PLINQ will take care of all the MultiThreading and load balancing stuff. You only have to give PLINQ a map and a reduce (or fold) function.
Lets consider a small example. Someone wants to compute the sum of the factorials of all integers from 1 to 3000. With List.map and List.fold_left this is a very easy task in F#:
#light
open System
let add a b = a + b
let fac (x:bigint) = [1I..x] |> List.fold_left (*) 1I
let sum =
[1I..3000I]
|> List.map fac
|> List.fold_left add 0I
printfn "Sum of Factorials: %A" sum
Of course you could do much much better if you don’t compute every factorial on its own (I will show this in one of the next parts) – but for this time I need an easy function that is time consuming.
This simple Task needs 27 sec. on my Core 2 Duo E6550 with 2.33 GHz and 3.5 GB RAM.
But we can do better if we use parallel map and fold functions with help of PLINQ:
let pMap (mapF:'a -> 'b) (data:IParallelEnumerable<'a>) =
ParallelEnumerable.Select(data, mapF)
let pFold foldF seed (data:IParallelEnumerable<'a>)=
ParallelEnumerable.Aggregate<'a,'b>(
data, seed, new Func<'b,'a,'b>(foldF))
Now we can easily transform our calculation to a parallel version:
let sum =
[1I..3000I].AsParallel<bigint>()
|> pMap fac
|> pFold add 0I
Putting all together we can write a small test application:
#light
open System
open System.Linq
open System.Diagnostics
let testRuntime f =
let watch = new Stopwatch()
watch.Start()
(f(),watch.Elapsed)
let add a b = a + b
let fac (x:bigint) = [1I..x] |> List.fold_left (*) 1I
let list = [1I..3000I]
let pMap (mapF:'a -> 'b) (data:IParallelEnumerable<'a>)=
ParallelEnumerable.Select(data, mapF)
let pFold foldF seed (data:IParallelEnumerable<'a>)=
ParallelEnumerable.Aggregate<'a,'b>(
data, seed, new Func<'b,'a,'b>(foldF))
let PLINQ() =
list.AsParallel<bigint>()
|> pMap fac
|> pFold add 0I
let sequential() =
list
|> List.map fac
|> List.fold_left add 0I
let (sumSequential,timeSequential) =
testRuntime sequential
printfn "Time Normal: %.3fs" timeSequential.TotalSeconds
let (sumPLINQ,timePLINQ) =
testRuntime PLINQ
printfn "Time PLINQ: %.3fs" timePLINQ.TotalSeconds
timePLINQ.TotalSeconds / timeSequential.TotalSeconds
|> printfn "Ratio: %.2f"
sumSequential = sumPLINQ
|> printfn "Same Results: %A"
On my machine I get the following results:
Time Normal: 27.955s
Time PLINQ: 15.505s
Ratio: 0.55
Same Results: true
This means I get nearly a perfect load balancing on my two processors for this task.
In part II I describe how one can compute a series of functions in parallel.
Tags:
F#,
F#,
Google,
Map and fold,
MapReduce,
Parallel Computing,
Parallel Extensions,
PLINQ
Thursday, 16. October 2008
Oct 16
Claus Lundstrøm zeigt in einem schönen Blogpost wie man in NAV2009 den Code auf Seite der ServiceTier (also auch remote) debuggen kann – und zwar über Visual Studio 2008 direkt im generierten C#-Code. Mit dieser Variante ist man nicht mehr gezwungen das Debugging über den Classic-Client zu tun, sondern kann direkt aus dem Dynamics NAV RoleTailored-Client debuggen.
Dummerweise ist der generierte C#-Code, wie das bei generiertem Code eigentlich immer der Fall ist, nicht gerade “optisch schöner” C#-Style und hat auch nur noch wenig mit dem Original-C/AL-Code zu tun – ist aber immerhin lesbar.
Das ist ein wirklich interessanter Ansatz und erlaubt mit etwas Geschick auch UnitTesting für NAV 2009. Dafür werde ich demnächst mal versuchen ein kleines Beispiel zu bloggen.
Tags:
C#,
Debugging,
Dynamics NAV 2009,
RoleTailored-Client,
UnitTest,
Visual Studio 2008
Tuesday, 14. October 2008
Oct 14
Florian Mätschke hat soeben seine auf der BASTA! 2008 in Mainz angekündigte Umfrage auf seinem Blog veröffentlicht. Dabei wurden die BASTA!-Speaker zu der Technologie befragt, die sie im Moment am meisten fasziniert. “Gewinner” ist übrigens Silverlight 2 geworden, dicht gefolgt von funktionaler Programmierung (in F# bzw. LINQ) – wofür ich mich übrigens auch entschieden habe.
Insgesamt ist das Umfrageergebnis, wie für die BASTA! zu erwarten war, sehr .NET-lastig. Obwohl auf der Abendveranstaltung noch Technologien wie Waschmaschine und Auto als faszinierend erachtet wurden, haben sich die meisten Speaker schlussendlich für ihr Vortragsthema im weitesten Sinne entschieden.
Ich muss sagen, dass ich das Konzept der Umfrage sehr interessant finde. Das Problem ist nur, dass man z.B. auf einer Java-Konferenz natürlich vollkommen konträre Ergebnisse erzielt. Um die wirklichen “Technologie Highlights“ zu ermitteln müsste man die Umfrage selbstverständlich viel größer und anonymisiert anlegen.
Tags:
BASTA! 2008,
C#,
F#,
Funktionale Programmierung,
LINQ,
Silverlight
Sunday, 12. October 2008
Oct 12
Luis Fallas beschreibt in seinem Blog (“Exploring Beautiful Languages”) an einem sehr schönen Beispiel, wie man die F# option types mit Hilfe von Extension Methods in C# verwenden kann.
Hier ist eine generische Variante zu seiner Exists()-Methode:
open System.Runtime.CompilerServices
[<Extension>]
module Extensions =
[<Extension>]
let Exists(opt : 'a option) =
match opt with
| Some _ -> true
| None –> false
Auf ähnlichem Wege kann man übrigens auch die generischen F#-Listen in System.Collections.Generic.List<T> umwandeln:
[<Extension>]
let ToCSharpList(list : 'a list) =
let csharpList =
new System.Collections.Generic.List<'a>()
list |> List.iter (fun item -> csharpList.Add item)
csharpList
Der umgekehrte Weg (von C# nach F#) ist fast analog, allerdings muss man die Liste drehen:
static class Extensions
{
/// <summary>
/// Converts a System.Collections.Generic.List<T>
/// in the corresponding F# list.
/// </summary>
public static Microsoft.FSharp.Collections.List<T>
ToFSharpList<T>(this List<T> list)
{
var fSharpList =
Microsoft.FSharp.Collections.List<T>.Empty;
for (int i = list.Count - 1; i >= 0; i--)
fSharpList =
Microsoft.FSharp.Collections.List<T>.Cons(
list[i],
fSharpList);
return fSharpList;
}
}
Tags:
C#,
C# vs. F#,
Extension Methods,
F#,
F# list,
F# option types,
System.Collections.Generic.List
Saturday, 5. April 2008
Apr 05
Microsoft hat am 31.3.2008 auf PartnerSource die erste Version von Dynamics Mobile veröffentlicht. Dabei handelt es sich primär um ein auf .NET basierendes Architekturkonzept mit dem man Mobile Endgeräte (mit Windows Mobile 5.0 oder 6.0) an ERP-Systeme (Dynamics NAV oder AX) anbinden kann. Weiterhin wird mit “Mobile Sales” jedoch eine umfangreiche Beispielanwendung mitgeliefert.
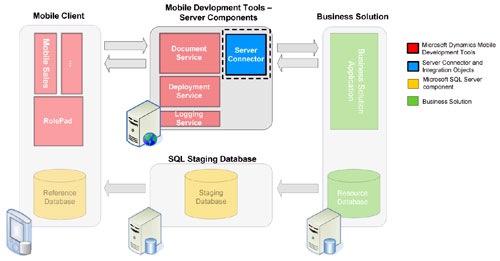
Das Release umfasst:
Dynamics Mobile wird momentan unterstützt für:
- Microsoft Dynamics NAV 5.0 SP1
- Microsoft Dynamics NAV 4.0 SP3
- Microsoft Dynamics AX 4.0 SP1
- Microsoft Dynamics AX 4.0 SP2
Tags:
C#,
Dynamics Mobile,
Dynamics Nav 5.0 SP1,
Mobile Development Tools




