Monday, 21. December 2015
Dec 21
[This post my second entry of the F# advent calendar 2015 series. You can also read the first post about “Using Async.Choice in Paket“]
Recently┬ĀI was asked to help with a website that was based on suave.io. The task was to transform the existing F# script based suave.io website to something that can be run in the enterprise infrastructure and also performs some background tasks like creating Excel reports recurringly.
Suave as a (windows) service
A lot of the suave.io samples work with simple .fsx script files. This approach is indeed simple and allows fast prototyping with the use of the REPL. Even more complex websites like fssnip.net┬Āare using this approach with great success (code here).┬ĀOne of the benefits of script based suave solutions is that they are often equipped with a FAKE build script that rebuilds the website automatically if someone changes a file. One prominent example┬Āis FsReveal:

But sometimes you want to have a “real Visual Studio project” with debugging support and your enterprise might want to install┬Āyour website as a Windows service. So the first step was to convert the F# script based approach into a project and adding TopShelf layer to make it runnable as Windows service. Thanks to a short blog post by Tomas Jansson this was super easy. It’s basically just installing TopShelf.FSharp via Paket┬Āand adding a single file with the config. Look into Tomas’s blog post to see the details.
After moving┬Āto the TopShelf model we still wanted to have automatic website rebuild whenever someone touched the source code. This little FAKE script makes this possible:
Running background jobs
The website already allowed to generate Excel reports by clicking somewhere in the UI. In addition to that we wanted to create the Excel reports recurringly in background jobs.┬ĀScott Hanselman has a blog post about “How to run Background Tasks in ASP.NET” and shows a couple of┬Āsolutions that while optimized for ASP.NET would probably work with suave.io as well. But in this case we wanted to have something that syncronizes with the IO of the website so we decided to use F#’s MailboxProcessor feature a.k.a. “agents”. (As always: Scott Wlaschin has a nice introduction to agents.)
As a small intro into background jobs we start with F# counter agent sample by Tomas Petricek:
This little snippet shows an agent that calculates averages of the messages that it receives. Now let’s add a background job that recurringly sends messages to the counter agent:
In order to use this we need a bit of ugly infrastructure code that we will hide in a library:
So let’s try this out in the F# interactive:

Since this works as expected we can use it in our website:
Since all the user triggered reporting will also go through this taskAgent we ensure that IO is synchronized.
Sample project
In https://github.com/forki/backgroundjobs you can find a sample project which does exactly the two points from above.

As you can see the website performs background jobs and is rebuilding/restarting automatically when a source code file is saved.
Tags:
F#,
fsadvent,
fsharp
Wednesday, 14. October 2015
Oct 14
As many readers already know I’m maintaing the open source projects FAKE and Paket. These projects are used in many companies and open source projects to make continuous integration work on .NET and mono.
In this article series I want to highlight some of the more┬Āunsual┬Āuse cases. Today I want to start and highlight the first 6 amazing┬Āprojects.
FsReveal
“FsReveal allows you to write beautiful slides in Markdown and brings C# and F# to the reveal.js web presentation framework.” [project site]
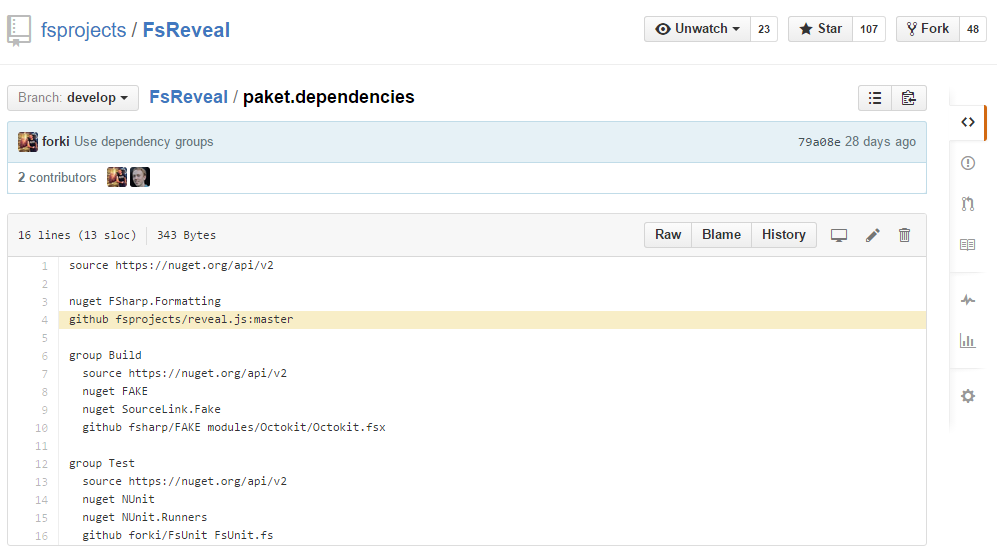
FsReveal uses Paket’s GitHub file dependencies┬Āfeature to download reveal.js:
It also uses┬Āa FAKE build script which converts Markdown files to html slides (via FSharp.Formatting) and runs these slides in a suave.io web server. FAKE’s file system watcher + suave’s socket implementation even allows you to edit your slides with automatic preview:
Stanford.NLP.NET
“Stanford.NLP for .NET is a port of Stanford NLP distributions to .NET.
This project contains build scripts that recompile Stanford NLP .jar packages to .NET assemblies using IKVM.NET, tests that help to be sure that recompiled packages are workable and Stanford.NLP for .NET documentation site that hosts samples for all packages. All recompiled packages are available on NuGet.” [project site]
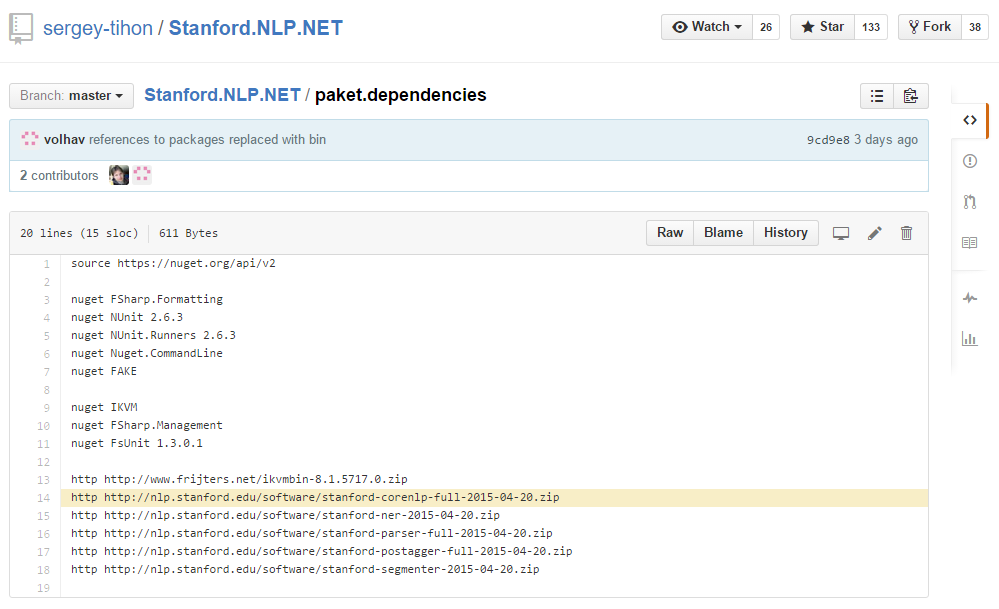
This project downloads .jar packages via Paket’s HTTP dependencies┬Āfeature,┬Ārecompiles everything to .NET via IKVM.NET in a FAKE build script and republishes it on NuGet. Automatic Java to .NET compilation – how cool is that?
Paket.VisualStudio
“Manage your Paket dependencies from Visual Studio!” [project site]
Paket.VisualStudio is a VisualStudio addin that you can download from Microsoft’s VisualStudio gallery. Unfortunately even in 2015 Microsoft doesn’t provide an API for automating the upload to its gallery. Therefore Paket.VisualStudio┬Āuses Paket’s NuGet dependencies┬Āfeature to download canopy and Selenium:

It then uses canopy + Selenium in a FAKE script to upload the addin via browser automation:

Ionide-F#
“It’s part of Ionide plugin suite. F# IDE-like possibilities in Atom editor” [project site]
Ionide is an Atom plugin written in F#. It’s using Paket and FAKE to automate the build and release process.
First it uses FunScript to transpile F# to Javascript and then automates npm┬Āto resolve Javascript dependencies and apm to upload the plugin to the Atom gallery.
Akka.Net
“Akka.NET is a community-driven port of the popular Java/Scala framework Akka to .NET.” [project site]
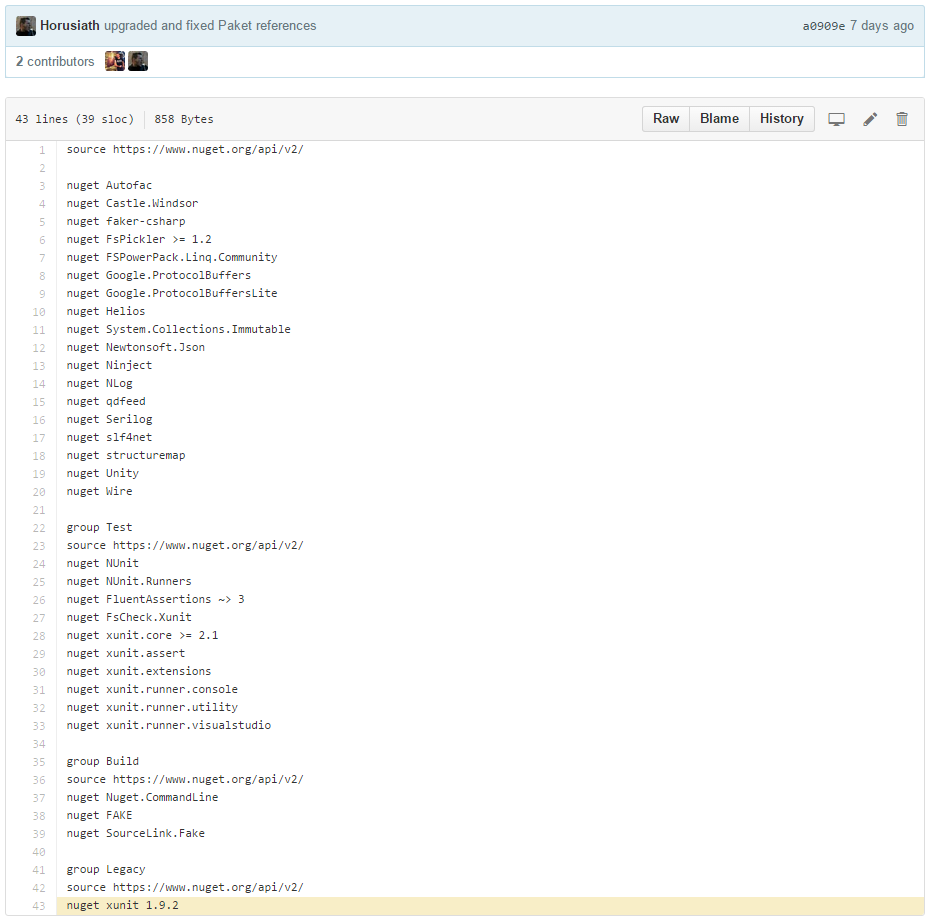
Akka.Net is a big (mainly C#) open source project that uses FAKE and Paket. One interesting observation is that it needs to create┬Ādifferent xUnit addins and therefore uses Paket’s groups feature to maintain the xUnit versions.
FSharp.Data
“The F# Data library┬Āimplements everything you need to access data in your F# applications and scripts. It implements F# type providers for working with structured file formats (CSV, HTML, JSON and XML) and for accessing the WorldBank data. It also includes helpers for parsing CSV, HTML and JSON files and for sending HTTP requests.” [project site]
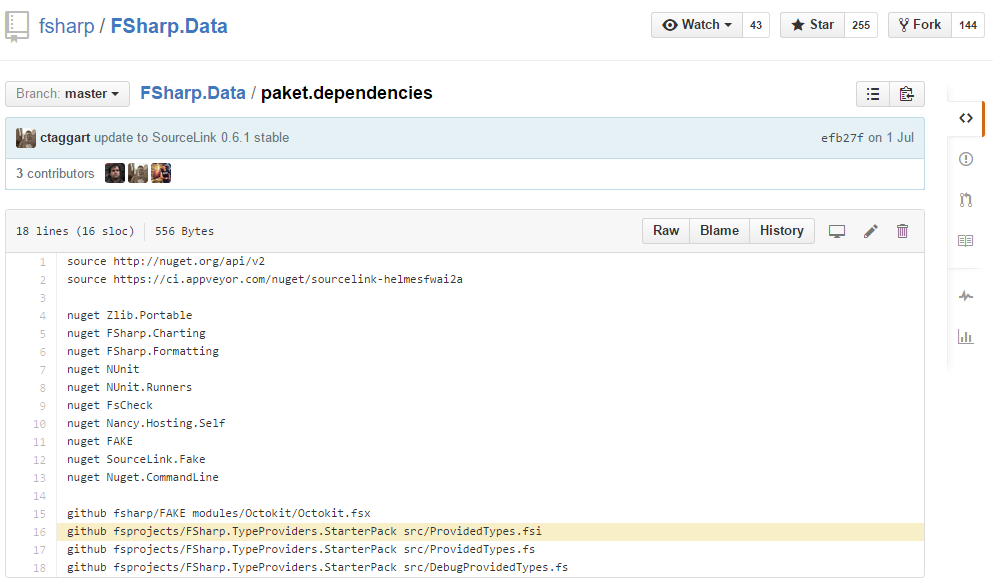
One of the many interesting things in FSharp.Data’s build is that it uses Paket to retrieve the┬ĀFSharp.TypeProviders.StarterPack. These files need to be┬Āincluded in any F# type provider project and Paket allows you to manage this easily.
Tags:
F#,
F-sharp Make
Friday, 18. January 2013
Jan 18
Today I’m happy to annouce that we have a new type provider in FSharpx. Yesterday I ported the WMI type provider from the F# sample pack and released it as a nuget package. This type provider allows to use Intellisense on data from the Windows Management Instrumentation (WMI).
Create a new F# project in Visual Studio 2012 and install the FSharpx.TypeProviders.Management package via nuget. The package manager references two libraries and you have to remove the reference to Samples.Management.TypeProvider.DesignTime manually. After you reference System.Management you can start to access WMI:
You can find a lot more samples in the F# Sample pack.
Tags:
F#,
wmi
Sunday, 6. January 2013
Jan 06
The “Walkthrough: Creating and Interacting with a Page Web Service (OData)” shows how we can easily access Dynamics NAV OData from the default company:
But somewhere in this process there seems to be a bug. If I want to access data from a different company I get a timeout:
I found a workaround for this, but if anybody knows more about this please write a comment.
Tags:
Microsoft Dynamics NAV,
Navision,
odata
Friday, 4. January 2013
Jan 04
In my last post I described how we can access Dynamics NAV 2009 SOAP web services from F# and the benefits we get by using a type provder. Since version 2013 it’s also possible to expose NAV pages via OData. In this article I will show you how the OData type provider which is part of F# 3 can help you to easily access this data.
Exposing the data
First of all follow this walkthrough┬Āand expose the Customer Page from Microsoft Dynamics NAV 2013 as an OData feed.
Show the available companies
Let’s try to connect to the OData feed and list all available companies. Therefore we create a new F# console project (.NET 4.0) in Visual Studio 2012 and add references to FSharp.Data.TypeProviders and System.Data.Services.Client. With the following snippet we can access and print the company names:
As you can see we don’t need to use the “Add Service Reference” dialog. All service type are generated on the fly.
Access data within a company
Unfortunately Dynamics NAV 2013 seems to have a bug in the generated metadata. In order to access data within a company we need to apply a small trick. In the following sample we create a modified data context which points directly to a company:
Now we can start to access the data:
As you can see this approach is very easy and avoids the problem with the manual code generation. If you expose more pages then they are instantly available in your code.
As with the Wsdl type provider you can expose the generated types from this F# project for use in C# projects.
Further information:
Tags:
fsharp,
Microsoft Dynamics NAV,
Navision,
type providers
Thursday, 3. January 2013
Jan 03
If you are a Dynamics NAV developer you have probably heared of the web services feature which comes┬Āwith the 2009 version. In this walkthrough┬Āyou can learn how to create and consume a Codeunit Web Service. This method works very well if you only need to create the C# proxy classes once. If you have more than one developer, an automated build system, changing web services or many web services then you will come to a point where this code generation system is very difficult to handle.
Microsoft Visual F# 3.0 comes with feature called “type providers” that helps to simplify your life in such a situation. For the case of WCF the┬ĀWsdl type provider┬Āallows us to automate the proxy generation. Let’s see how this works.
Web service generation
In the first step we create the Dynamics NAV 2009 Codeunit web service in exactly the same way as in the MSDN walkthrough.
Connecting to the web service
Now we create a new F# console project (.NET 4.0 or 4.5) in Visual Studio 2012 and add references to┬ĀFSharp.Data.TypeProviders,┬ĀSystem.Runtime.Serialization and┬ĀSystem.ServiceModel. After this we are ready to use the Wsdl type provider:
At this point the type provider creates the proxy classes in the background – no “add web reference” dialog is needed. The only thing we need to do is configuring the access security and consume the webservice:
Access from C#
This is so much easier than the C# version from the walkthrough. But if you want you can still access the provided types from C#. Just add a new C# project to the solution and reference the F# project. In the F# project rename Program.fs to Services.fs and expose the service via a new function:
In the C# project you can now access the service like this:
Changing the service
Now let’s see what happens if we change the service. Go to the Letters Codeunit in Dynamics NAV 2009 and add a second parameter (allLetters:Boolean) to the Capitalize method. After saving the Codeunit go back to the C# project and try to compile it again. As you can see the changes are directly reflected as a compile error.
In the next blog post I will show you how you can easily access a Dynamics NAV 2013 OData feed from F#.
Tags:
fsharp,
Microsoft Dynamics NAV,
nav,
Navision
Tuesday, 13. April 2010
Apr 13
Yesterday Microsoft released the RTM versions of Visual Studio 2010, .NET Framework 4.0 and F# 2.0.0.0 and so it is time to announce the first official releases of ŌĆ£Fake ŌĆō F# MakeŌĆØ and NaturalSpec. Both projects are now compatible with Visual Studio 2010 RC and RTM and the corresponding F# versions.
Fake ŌĆō F# Make version 1.0.0
"FAKE – F# Make" is a build automation system, which is intended to provide a much better tooling support than XML-based build languages like MSBuild or NAnt. Due to its integration in F#, all benefits of the .NET Framework and functional programming can be used, including the extensive class library, powerful debuggers and integrated development environments like Visual Studio 2008, Visual Studio 2010 or SharpDevelop, which provide syntax highlighting and code completion.
Like F# itself the new build language was designed to be succinct, typed, declarative, extensible and easy to use.
NaturalSpec version 1.0.0
NaturalSpec is a UnitTest framework based on NUnit and completely written in F# – but you don’t have to learn F# to use it. The idea is that you can write your spec mostly in a natural language like in the following sample:
[<Scenario>]
let “When removing an element from a list it should not contain the element“() =
Given [1;2;3;4;5] // "Arrange" test context
|> When removing 3 // "Act"
|> It shouldn’t contain 3 // "Assert"
|> It should contain 4 // another assertion
|> It should have (Length 4) // Assertion for length
|> It shouldn’t have Duplicates // it contains duplicates ?
|> Verify // Verify scenario
If you have any questions about the projects feel free to contact me.
Tags:
F#,
F-sharp Make,
NaturalSpec,
Visual Studio 2010
Wednesday, 15. April 2009
Apr 15
Thursday, 5. March 2009
Mar 05
 "Implementing Microsoft Dynamics NAV 2009" is a new book by David Roys (MVP for Dynamics NAV) and Vjekoslav Babic (Dynamics NAV consultant). It shows the new features of Dynamics NAV 2009 in step-by-step explanations of real-world examples.
If you are interested in this book you can read the complete seventh chapter right here on navision-blog.de:
Chapter 6 (ŌĆ£Modifying the SystemŌĆØ) is also available for download.
What the book covers
Chapter 1
The purpose of this chapter is a teaser introduction to get you excited about the product, what’s in it in general, and what’s in it as compared to previous versions, to give you a little taste of what’s coming up in the book, and explain what the fuss about this new release is all about.
Chapter 2
The RoleTailored client is the new user interface for users of Microsoft Dynamics NAV 2009, and it is completely different to the pervious versions. We’ll take you through the different components of the interface, introduce the terminology, explore the navigation components and page types, and teach you how to personalize the application to meet your own requirements using the extensive personalization features.
Chapter 3
Microsoft Dynamics NAV 2009 introduces a new paradigm to ERP. Instead of the system being focused on the forms that capture and present data and the functions the user can perform, the system is based around the individuals within an organization, their roles, and the tasks they perform. We cover how Microsoft researched the roles and explore the departments, roles, and tasks that have been identified in the Microsoft Dynamics Customer Model. We also show the reader how to assign the standard roles to users, how to create new roles, and how to allow departmental super users to configure the application for their role so that the change is applied to all users with the same profile.
Chapter 4
Microsoft Dynamics NAV is not a product with a Next-Next-Finish type of installation, and it takes a lengthy project to deploy it successfully. We focus on the six phases of the implementation process, and explain each phase with detailed dos and don’ts for a typical implementation. Based on the Dynamics Sure Step implementation methodology with advice liberally sprinkled throughout, special attention is given to new features of Microsoft Dynamics NAV 2009, and where the new capabilities must be taken into account to make most out of the implementation project.
Chapter 5
Every implementation of Microsoft Dynamics NAV 2009 will require the system to be configured to meet the needs of the business. This chapter tells the implementation consultant how to do this from a core financials perspective and provides valuable information that will allow developers to understand more about the application they are changing. We cover basic accounting for programmers, dimensions, and posting groups, and how to use the Rapid Implementation Methodology (RIM) Toolkit to speed things along.
Hardly any standard system can fit the needs of a business out of the box. Either the customer must shape their processes to match the system, or the consultant must shape the system to match the processes, and usually the latter prevails. This chapter explains the process of modifying the system, how to design a viable data model, and how to design and develop a functional user interface for both RoleTailored and Classic clients, without writing any code.
The three-tiered architecture of Microsoft Dynamics NAV 2009 and native Web Services Enablement open up a whole new world of possibilities for NAV implementations. We cover some of the many possibilities for extending the application, allowing the consultant and developer to understand the technologies that are available and their respective design considerations. Our practical examples introduce the NAV programmer to the world of .NET and show how you can use the information available on the internet to develop your own killer .NET add-ons.
Chapter 8
There’s much more to development than programming. It starts with understanding what customer really needs, and usually extends way beyond the system being deployed to a test environment. This chapter focuses on the development phase, and what it takes to get from a concept to a live and working solution.
Chapter 9
After the system goes live, or as it grows, there are periods when new problems may arise, and often their source is far from obvious. This chapter explores the tools and techniques available for detecting problems, pinpointing the source, and helping to remove them from the system quickly and painlessly. It explains how to debug the Service Tier, how to troubleshoot performance issues, what can be done to avoid problems, and how proper planning before design can help to get it right the first time.
Chapter 10
Our sample application focuses on requirements gathering, functional specification creation, solution design, and the eventual build of a prototype. We look at how a business problem can be explored using techniques such as interviewing, use-case modeling, and object-role modeling to create a solution design that can be molded into a working prototype.
If you want to get more information about the book visit: http://www.packtpub.com/implementing-microsoft-dynamics-nav-2009/book
Tags:
Dynamics NAV 2009,
Navision
Sunday, 11. January 2009
Jan 11
In the last 3 posts I show how to set up a Continuous Integration environment for F# or C# projects with Subversion (part I), TeamCity (part II) and NUnit (part III).
This time I want to show how we can set up an automated documentation build.
Installing and using GhostDoc
ŌĆ£GhostDoc is a free add-in for Visual Studio that automatically generates XML documentation comments for C#. Either by using existing documentation inherited from base classes or implemented interfaces, or by deducing comments from name and type of e.g. methods, properties or parameters.ŌĆØ
[product website]
GhostDoc is one of my favorite Visual Studio plugins. It allows me to generate comments for nearly all my C# functions. Of course these generated comments arenŌĆÖt sufficient in every case ŌĆō but they are a very good start.
Unfortunately GhostDoc doesnŌĆÖt work for F# ¤Öü ŌĆō the actual version works for C# and the support for VB.Net is called “experimental”.
Download and install http://www.roland-weigelt.de/ghostdoc/.
Now you should be able to generate XML-based comments directly in your C# code:


The next step is to activate the xml-documentation in your Visual Studio build settings:

Commiting these changes and adjusting the build artifacts will produce the input for the documentation build:


Using Sandcastle to generate a documentation
ŌĆ£Sandcastle produces accurate, MSDN style, comprehensive documentation by reflecting over the source assemblies and optionally integrating XML Documentation Comments. Sandcastle has the following key features:
- Works with or without authored comments
- Supports Generics and .NET Framework 2.0
- Sandcastle has 2 main components (MrefBuilder and Build Assembler)
- MrefBuilder generates reflection xml file for Build Assembler
- Build Assembler includes syntax generation, transformation..etc
- Sandcastle is used internally to build .Net Framework documentationŌĆØ
[Microsoft.com]
Download and install ŌĆ£Sandcastle – Documentation Compiler for Managed Class LibrariesŌĆØ from MircosoftŌĆÖs downloadpage or http://www.codeplex.com/Sandcastle.
For .chm generation you also have to install the “HTML Help Workshop“. If you want fancy HTMLHelp 2.x style (like MSDN has) you need ŌĆ£Innovasys HelpStudio LiteŌĆØ which is part of the Visual Studio 2008 SDK.
ŌĆ£HelpStudio Lite is offered with the Visual Studio SDK as an installed component that integrates with Visual Studio. HelpStudio Lite provides a set of authoring tools you use to author and build Help content, create and manage Help projects, and compile Help files that can be integrated with the Visual Studio Help collection.ŌĆØ
[MSDN]
Last but not least I recommend to install the Sandcastle Help File Builder (SHFB) ŌĆō this tool gives you a GUI and helps to automate the Sandcastle process.
ŌĆ£Sandcastle, created by Microsoft, is a tool used for creating MSDN-style documentation from .NET assemblies and their associated XML comments files. The current version is the May 2008 release. It is command line based and has no GUI front-end, project management features, or an automated build process like those that you can find in NDoc. The Sandcastle Help File Builder was created to fill in the gaps, provide the missing NDoc-like features that are used most often, and provide graphical and command line based tools to build a help file in an automated fashion.ŌĆØ
[product homepage]
After the installation process start SHFB to generate a documentation project:

Add the TestCITestLib.dll to your project and add nunit.framework.dll as a dependency. Now try to compile your help project ŌĆō if everything is fine the output should look something like this:

Setting up the documentation build
One of the main principles of Continuous Integration is ŌĆ£Keep the Build FastŌĆØ ŌĆō so I am working with staged builds here. The documentation build should only be started if the first build was successful and all UnitTests are positive. For most projects it is enough to generate the documentation daily or even weekly.
First of all we have to create a simple MSBuild file which executes the SHFB project:
<Project ToolsVersion="3.5" xmlns="http://schemas.microsoft.com/developer/msbuild/2003">
  <!-- 3rd Party Program Settings -->
  <PropertyGroup>
    <SandCastleHFBPath>c:\Program Files (x86)\EWSoftware\Sandcastle Help File Builder\</SandCastleHFBPath>
    <SandCastleHFBCmd>$(SandCastleHFBPath)SandcastleBuilderConsole.exe</SandCastleHFBCmd>
    <SandCastleHFBProject>HelpProject.shfb</SandCastleHFBProject>
  </PropertyGroup>

  <Target Name="BuildDocumentation">
    <!-- Build source code docs -->
    <Exec Command="%22$(SandCastleHFBCmd)%22 %22$(SandCastleHFBProject)%22" />
  </Target>
</Project>
Add this build file and the SHFB project to your Visual Studio solution folder and commit these changes.

Now we can create a new TeamCity build configuration:

Take the same Version Control Settings like in the first build but use MSBuild as the build runner:

We want the documentation to be generated after a successful main build so we add a ŌĆ£dependency build triggerŌĆØ:

Now we need the artifacts from the main build as the input for our documentation build:

Be sure you copy the artifacts to the right directory as given in your .shfb-project. Now run the DocumentationBuild ŌĆō if everything is fine the DocumentationBuild should give you the Documentation.chm as a new artifact:

Tags:
Continuous Integration,
F#,
GhostDoc,
JetBrains,
NDoc,
Sandcastle,
Sandcastle Help File Build,
subversion,
TeamCity,
Visual Studio 2008,
Visual Studio SDK


