Sunday, 11. January 2009
Jan 11
In the last 3 posts I show how to set up a Continuous Integration environment for F# or C# projects with Subversion (part I), TeamCity (part II) and NUnit (part III).
This time I want to show how we can set up an automated documentation build.
Installing and using GhostDoc
ŌĆ£GhostDoc is a free add-in for Visual Studio that automatically generates XML documentation comments for C#. Either by using existing documentation inherited from base classes or implemented interfaces, or by deducing comments from name and type of e.g. methods, properties or parameters.ŌĆØ
[product website]
GhostDoc is one of my favorite Visual Studio plugins. It allows me to generate comments for nearly all my C# functions. Of course these generated comments arenŌĆÖt sufficient in every case ŌĆō but they are a very good start.
Unfortunately GhostDoc doesnŌĆÖt work for F# ¤Öü ŌĆō the actual version works for C# and the support for VB.Net is called “experimental”.
Download and install http://www.roland-weigelt.de/ghostdoc/.
Now you should be able to generate XML-based comments directly in your C# code:


The next step is to activate the xml-documentation in your Visual Studio build settings:

Commiting these changes and adjusting the build artifacts will produce the input for the documentation build:


Using Sandcastle to generate a documentation
ŌĆ£Sandcastle produces accurate, MSDN style, comprehensive documentation by reflecting over the source assemblies and optionally integrating XML Documentation Comments. Sandcastle has the following key features:
- Works with or without authored comments
- Supports Generics and .NET Framework 2.0
- Sandcastle has 2 main components (MrefBuilder and Build Assembler)
- MrefBuilder generates reflection xml file for Build Assembler
- Build Assembler includes syntax generation, transformation..etc
- Sandcastle is used internally to build .Net Framework documentationŌĆØ
[Microsoft.com]
Download and install ŌĆ£Sandcastle – Documentation Compiler for Managed Class LibrariesŌĆØ from MircosoftŌĆÖs downloadpage or http://www.codeplex.com/Sandcastle.
For .chm generation you also have to install the “HTML Help Workshop“. If you want fancy HTMLHelp 2.x style (like MSDN has) you need ŌĆ£Innovasys HelpStudio LiteŌĆØ which is part of the Visual Studio 2008 SDK.
ŌĆ£HelpStudio Lite is offered with the Visual Studio SDK as an installed component that integrates with Visual Studio. HelpStudio Lite provides a set of authoring tools you use to author and build Help content, create and manage Help projects, and compile Help files that can be integrated with the Visual Studio Help collection.ŌĆØ
[MSDN]
Last but not least I recommend to install the Sandcastle Help File Builder (SHFB) ŌĆō this tool gives you a GUI and helps to automate the Sandcastle process.
ŌĆ£Sandcastle, created by Microsoft, is a tool used for creating MSDN-style documentation from .NET assemblies and their associated XML comments files. The current version is the May 2008 release. It is command line based and has no GUI front-end, project management features, or an automated build process like those that you can find in NDoc. The Sandcastle Help File Builder was created to fill in the gaps, provide the missing NDoc-like features that are used most often, and provide graphical and command line based tools to build a help file in an automated fashion.ŌĆØ
[product homepage]
After the installation process start SHFB to generate a documentation project:

Add the TestCITestLib.dll to your project and add nunit.framework.dll as a dependency. Now try to compile your help project ŌĆō if everything is fine the output should look something like this:

Setting up the documentation build
One of the main principles of Continuous Integration is ŌĆ£Keep the Build FastŌĆØ ŌĆō so I am working with staged builds here. The documentation build should only be started if the first build was successful and all UnitTests are positive. For most projects it is enough to generate the documentation daily or even weekly.
First of all we have to create a simple MSBuild file which executes the SHFB project:
<Project ToolsVersion="3.5" xmlns="http://schemas.microsoft.com/developer/msbuild/2003">
  <!-- 3rd Party Program Settings -->
  <PropertyGroup>
    <SandCastleHFBPath>c:\Program Files (x86)\EWSoftware\Sandcastle Help File Builder\</SandCastleHFBPath>
    <SandCastleHFBCmd>$(SandCastleHFBPath)SandcastleBuilderConsole.exe</SandCastleHFBCmd>
    <SandCastleHFBProject>HelpProject.shfb</SandCastleHFBProject>
  </PropertyGroup>

  <Target Name="BuildDocumentation">
    <!-- Build source code docs -->
    <Exec Command="%22$(SandCastleHFBCmd)%22 %22$(SandCastleHFBProject)%22" />
  </Target>
</Project>
Add this build file and the SHFB project to your Visual Studio solution folder and commit these changes.

Now we can create a new TeamCity build configuration:

Take the same Version Control Settings like in the first build but use MSBuild as the build runner:

We want the documentation to be generated after a successful main build so we add a ŌĆ£dependency build triggerŌĆØ:

Now we need the artifacts from the main build as the input for our documentation build:

Be sure you copy the artifacts to the right directory as given in your .shfb-project. Now run the DocumentationBuild ŌĆō if everything is fine the DocumentationBuild should give you the Documentation.chm as a new artifact:

Tags:
Continuous Integration,
F#,
GhostDoc,
JetBrains,
NDoc,
Sandcastle,
Sandcastle Help File Build,
subversion,
TeamCity,
Visual Studio 2008,
Visual Studio SDK
Thursday, 8. January 2009
Jan 08
In the last two posts I showed how to set up a Subversion (part I: Setting up Source Control) and a TeamCity server (part II: Setting up a Continuous Integration Server).
This time I will show how we can integrate NUnit to run automated test at each build. TeamCity supports all major Testing Frameworks (including MS Test) but I will concentrate on NUnit here.
"NUnit is a unit-testing framework for all .Net languages. Initially ported from JUnit, the current production release, version 2.4, is the fifth major release of this xUnit based unit testing tool for Microsoft .NET. It is written entirely in C# and has been completely redesigned to take advantage of many .NET language features, for example custom attributes and other reflection related capabilities. NUnit brings xUnit to all .NET languages."
[product homepage]
Creating a TestProject
First of all download and install NUnit 2.4.8 (or higher) from http://www.nunit.org/.
Now we add a small function to our F# source code:
let rec factorial = function
  | 0 -> 1
  | n when n > 0 -> n * factorial (n-1)
  | _ -> invalid_arg "Argument not valid"
This is the function we want to test. We add a new C# class library to our solution (e.g. ŌĆ£TestCITestLibŌĆØ ¤śē ) and add a reference to nunit.framework. Inside this new TestLibrary we add a TestClass with the following code:
namespace TestCITestLib
{
    using NUnit.Framework;

    [TestFixture]
    public class FactorialTest
    {
        [Test]
        public void TestFactorial()
        {
            Assert.AreEqual(1, Program.factorial(0));
            Assert.AreEqual(1, Program.factorial(1));
            Assert.AreEqual(120, Program.factorial(5));
        }

        [Test]
        public void TestFactorialException()
        {
            Program.factorial(-1);
        }
    }
}
To ensure the build runner is able to compile our solution we put the nunit.framework.dll near to our TestProject and commit our changes.

Configure TeamCity for UnitTesting
The next step is to tell TeamCity that the build runner should run our UnitTests:

If we now run the build we should get the following error:

Our second test function failed, because we didnŌĆÖt expect the System.ArgumentException. We can fix this issue by adding the corresponding attribute to the Testfunction:
[Test,
 ExpectedException(typeof(System.ArgumentException))]
public void TestFactorialException()
{
    Program.factorial(-1);
}0

Configure the build output
At this point we have a minimalistic Continuous Integration infrastructure. Every time someone performs a Commit on our repository a automated build will be started and the sources will be tested against the given UnitTests. Now we should concentrate on getting our build output ŌĆō the artifacts. The term artifact is usually used to refer to files or directories produced during a build. Examples of such artifacts are:
- Binaries (*.exe, *.dll)
- Software packages and installers (*.zip, *.msi)
- Documentation files (e.g. help files)
- Reports (test reports, coverage reports, ŌĆ”)
At this time we are only interested in the binaries (this means CITestLib.dll). We can add the following artifact definition to our TeamCity project:

If we now rebuild our solution the build runner collects the configured artifacts and stores them with all build information:

Next time I will show how we can add more artifacts ŌĆō e.g. an automated documentation.
Tags:
Continuous Integration,
F#,
JetBrains,
MSTest,
nunit,
subversion,
TeamCity,
UnitTest,
UnitTesting,
Visual Studio 2008
Jan 08
In the last post I showed how easy it is to install Subversion and how it can be integrated into Visual Studio 2008 via AnkhSVN. This time we will set up a Continuous Integration server and configure a build runner.
As a Continuous Integration Server I recommend JetBrains TeamCity. You can download the free professional edition at http://www.jetbrains.com/teamcity/.
Installing TeamCity
During the installation process TeamCity wants to get a port number. Be sure that there will be no conflict with other web applications on your server. I chose port 8085 ŌĆō and my first build agent got this default settings:

In the next step you have to sign the License Agreement and to create an administrator account:

Creating a Project
Now you can create your project and set up the build configuration:


Setting up a build runner
For setting up specific build runners see the TeamCity documentation. For now I will use the ŌĆ£sln2008ŌĆØ-Build runner (the Runner for Microsoft Visual Studio 2008 solution files).

Now add a build trigger. Whenever someone performs a Commit on the Subversion repository the server has to start a build.

Testing the build runner
After this step we have two options to start a build. The first one is by clicking the ŌĆ£RunŌĆØ-button on the project website and the second is doing a checkin:

After performing the Commit the pending build appears on the project website:

After 60 seconds (see my configuration above) the build is starting. After the build is complete one can see the results in different ways. The simplest is via the project website:

Of cause TeamCity gives you a lot of different notification and monitoring possibilities including mail, RSS feeds or System Tray Notifications.
Next time I will show how we can integrate UnitTesting in our automated build scenario.
Tags:
Continuous Integration,
F#,
JetBrains,
subversion,
TeamCity,
Visual Studio 2008
Jan 08
In this post series I will show how one can easily set up a Continuous Integration scenario for F# or C# projects with completely free products.
ŌĆ£Continuous Integration is a software development practice where members of a team integrate their work frequently, usually each person integrates at least daily – leading to multiple integrations per day. Each integration is verified by an automated build (including test) to detect integration errors as quickly as possible.ŌĆØ
[Martin Fowler]
The first step for Continuous Integration is to set up a Source Control environment. For many good reasons I choose Subversion – some of them are:
- Atomic commits
- Rename/Move/Copy actions preserve the revision history
- Directories are versioned
- Multiple repository access protocols including HTTP and HTTPS
- There is a nice Visual Studio integration (see below)
- Last but not least: it is completely free ¤Öé
Source code version control with Subversion
All you need for setting up a complete Subversion environment is to download and install VisualSVN Server from http://www.visualsvn.com/.
ŌĆ£VisualSVN Server is a package that contains everything you need to install, configure and manage Subversion server for your team on Windows platform. It includes Subversion, Apache and a management console.ŌĆØ
[product homepage]
Now you can create user accounts and a repository ŌĆØCITestŌĆØ in the VisualSVN Server management console.


Subversion integration in Visual Studio 2008
Download and install AnkhSVN 2.0.x from http://ankhsvn.open.collab.net/.
ŌĆ£AnkhSVN is a Subversion SourceControl Provider for Visual Studio. The software allows you to perform the most common version control operations directly from inside the Microsoft Visual Studio IDE. With AnkhSVN you no longer need to leave your IDE to perform tasks like viewing the status of your source code, updating your Subversion working copy and committing changes. You can even browse your repository and you can plug-in your favorite diff tool.ŌĆØ
[product homepage]
Now you can add your C#/F#-solution to your CITest-repository:
- Open the solution in Visual Studio 2008
- Open ŌĆ£View/Repository ExplorerŌĆØ and add your repository to AnkhSVN
- You can copy the URL from the VisualSVN Server management console (In my case this is https://omega:8443/svn/CITest/)
- You also have to give AnkhSVN your Subversion login
- Now click the right mouse button on your solution in the Solution Explorer and choose ŌĆ£Add Solution to SubversionŌĆØ


Now we can modify our solution and commit our changes via ŌĆ£Commit solution changesŌĆØ in the Solution Explorer:

We can easily control our changes via AnkhSVNŌĆÖs ŌĆ£Repository ExplorerŌĆØ and ŌĆ£History ViewerŌĆØ in Visual Studio 2008:

If we do any changes in the Program.fs file, we can see a diff via the ŌĆ£Show changesŌĆØ functionality:

If you donŌĆÖt like the default Diff tool you might try WinMerge.
Next time I will show how to set up a Continuous Integration server.
Tags:
AnkhSVN,
Continuous Integration,
F#,
Source Control,
subversion,
Visual Studio 2008,
VisualSVN,
WinMerge
Saturday, 1. March 2008
Mar 01
Wie bereits vor einiger Zeit im Blog berichtet, habe ich für unseren internen Produktionsablauf ein Tool geschrieben, das es ermöglicht eine Quellcodeversionsverwaltung (z.B. VSS, SVN oder Team Foundation Server) direkt in Dynamics NAV zu integrieren. Jetzt habe ich mir mal die Mühe gemacht, die wichtigsten Funktionen in einem kleinen Screencast zu dokumentieren. (Dies ist jedoch erstmal nur eine Vorabversion des Videos.)┬Ā
Das Schöne an diesem Tool ist, dass man aus beiden Blickrichtungen alle nötigen Informationen zu einer Version bekommt. Ich sehe also an der Datei die Änderungshistorie mit den entsprechenden ChangeRequests oder Ticketnummern und kann auch rückwärts an einer Aufgabe sehen, welche Änderungen dafür konkret am Quellcode gemacht wurden und von wem.
Für Visual Studio-Nutzer ist das natürlich nichts neues, aber gerade im ERP-Bereich wird oft (mangels fehlender Tools) auf eine Quellcodeverwaltung verzichtet.
Tags:
dynamics-nav,
Navision,
SCMSHelper,
subversion,
svn,
Team Foundation Server,
TFS,
vss
Sunday, 26. March 2006
Mar 26
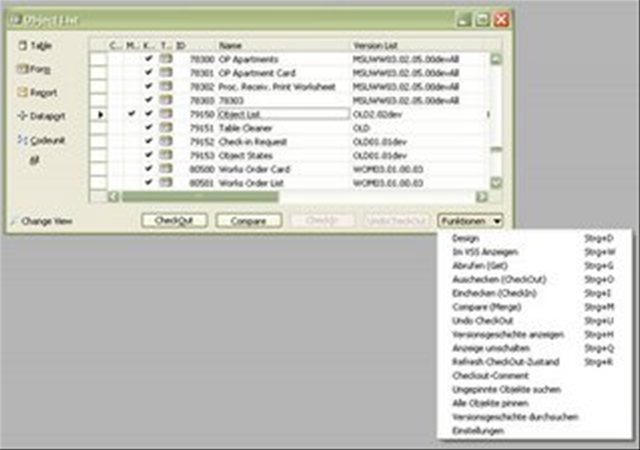
Da es keine native Möglichkeit gibt ein Quellcode-Versionsverwaltungsprogramm in Microsoft Navision einzubinden, haben wir bei der msu solutions GmbH eine eigene Lösung zum Zugriff auf Visual Source Safe oder Subversion (SVN) implementiert. Die entstandene Lösung ist ein Hybrid aus C# 2.0 COM-Objekten und nativen Navision-Objekten.

Der allgemeine Arbeitsablauf gestaltet sich nun folgendermaßen:
- Eine Aufgabe aus dem internen Bug & Task Tracker ziehen.
- Statt dem klassischen “Design” im Object Designer einfach im internen Object Designer auf “Auschecken” klicken. Dadurch wird das Objekt im VSS ausgecheckt und die aktuelle Version neu ins Navision importiert und im Designer geöffnet.
- Nun kann man im Navision Quelltext Editor Änderungen vornehmen und evtl. weitere Objekte auschecken.
- Vor dem Einchecken auf “Compare” klicken. Dadurch wird ein Diff zwischen der bearbeiteten Version und der Version im VSS angezeigt. (Das Diff-Programm kann frei gewählt werden. Standardmäßig ist WinMerge eingestellt.)
- Im internen Object Designer auf die ausgecheckten Objekte filtern und die Objekte durch Klick auf “Einchecken” mit dem aus dem Bug & Task Tracker vorgegebenen Checkin-Kommentar ins VSS einchecken.
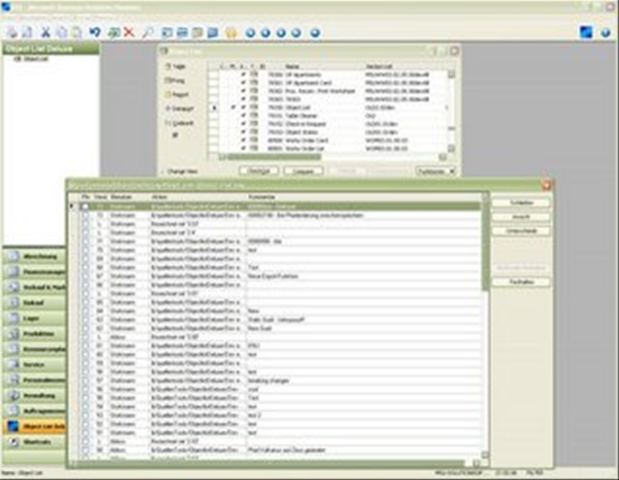
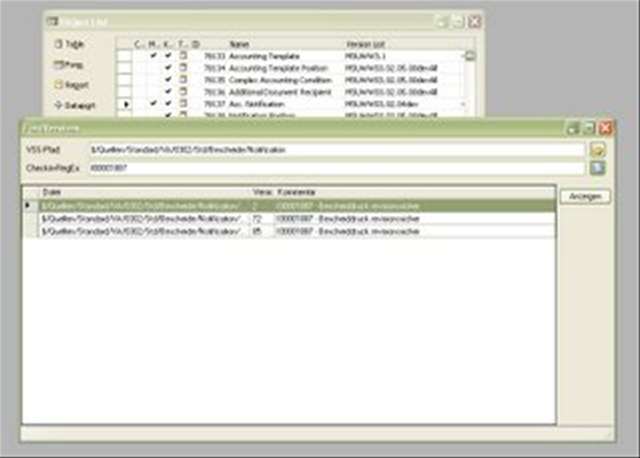
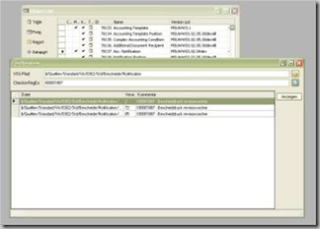
Als weiteres besonderes Feature ist die Versionsgeschichte zu nennen. Im internen Object Designer kann man einfach auf ein Objekt gehen und durch Druck auf “History” die Versionsgeschichte des Objektes aus dem Visual SourceSafe abrufen. Dort kann man die Checkin-Kommentare ansehen, Version-Pins versetzen und sich Diffs zwischen den verschiedenen Versionen anzeigen lassen.
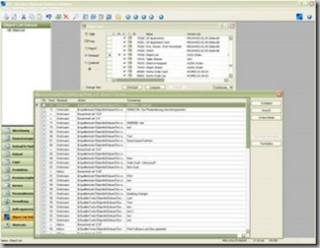
Interessant ist auch die interne Suchen nach Objekten (und deren Versionen bzw. Differenz dazwischen) die mit einer bestimmten Aufgabe geändert wurden. So fällt das Portieren von Features zwischen verschiedenen Entwicklungszweigen wesentlich leichter.
So macht das Programmieren in Navision gleich viel mehr Spaß und die Versionsverwaltung ist damit fast so einfach wie im Visual Studio – da bleiben dann ja nur noch die beiden größten Navision Schwächen: Editor und Debugger ¤Öé
Tags:
C#,
com,
cvs,
Navision,
perforce,
quellcodeverwaltung,
source-safe,
subversion,
svn,
Tools,
visual-source-safe,
vss